How to Install and Configure Motion on Your Linux Server
Introduction
In this tutorial I will show you how to turn a computer -or a server- into a surveillance system. In this example I will use USB cameras (no wireless all wired). Topics like motion detection with audio, alarm and using multiple cameras will be covered in this tutorial.
Prerequisites
- A computer -or server- running Linux with at least (minimum requisites) an i7 9th generation processor, 2-3 USB3 controllers and 16 GB RAM
- 4 USB Webcams and USB3 extension cables
Motion Installation
Install Motion Opensuse Leap Linux
# zypper in motion
Istall Motion on Ubuntu Linux
$ sudo apt update
$ sudo apt install motion
Motion Configuration
You can configure motion using configuration files, the file moton.conf should be located at /etc/motion/motion.conf but I highly suggest that you use a normal user to run motion. So, you can create “.motion” in the home directory and copy the motion.conf file in that directory this way:
# pwd
/home/user
# md .motion
# cp /etc/motion/motion.conf .motion/
# chown -R user:motion .motion
# exit
Once copied the file you can configure the motion server, here is my configuration file for this specific case:
############################################################
# System control configuration parameters
############################################################
# Start in daemon (background) mode and release terminal.
daemon on
# Start in Setup-Mode, daemon disabled.
setup_mode off
# File to write logs messages into.  If not defined stderr and syslog is used.
# log_file
# Level of log messages [1..9] (EMG, ALR, CRT, ERR, WRN, NTC, INF, DBG, ALL).
log_level 6
# Target directory for pictures, snapshots and movies
target_dir /data/motion-media
############################################################
# Image Processing configuration parameters
############################################################
# Image width in pixels.
#width 640
# Image height in pixels.
#height 480
# Maximum number of frames to be captured per second.
framerate 15
# Text to be overlayed in the lower left corner of images
text_left CAMERA1
# Text to be overlayed in the lower right corner of images.
text_right %Y-%m-%d\n%T-%q
############################################################
# Motion detection configuration parameters
############################################################
# Always save pictures and movies even if there was no motion.
emulate_motion off
# Threshold for number of changed pixels that triggers motion.
threshold 2000
# Noise threshold for the motion detection.
#noise_level 32
# Number of images that must contain motion to trigger an event.
minimum_motion_frames 1
# Gap in seconds of no motion detected that triggers the end of an event.
event_gap 60
# The number of pre-captured (buffered) pictures from before motion.
pre_capture 1
# Number of frames to capture after motion is no longer detected.
post_capture 25
############################################################
# Script execution configuration parameters
############################################################
# Command to be executed when an event starts.
; on_event_start value
# Command to be executed when an event ends.
; on_event_end value
# Command to be executed when a movie file is closed.
; on_movie_end value
############################################################
# Picture output configuration parameters
############################################################
# Output pictures when motion is detected
picture_output off
# File name(without extension) for pictures relative to target directory
picture_filename %Y%m%d%H%M%S-%q
############################################################
# Movie output configuration parameters
############################################################
# Create movies of motion events.
movie_output on
# Maximum length of movie in seconds.
movie_max_time 300
# The encoding quality of the movie. (0=use bitrate. 1=worst quality, 100=best)
movie_quality 80
# Container/Codec to used for the movie. See motion_guide.html
movie_codec mp4
# File name(without extension) for movies relative to target directory
movie_filename %m-%d-%Y_%H:%M:%S
############################################################
# Webcontrol configuration parameters
############################################################
# Port number used for the webcontrol.
webcontrol_port 8080
# Restrict webcontrol connections to the localhost.
webcontrol_localhost off
# Type of configuration options to allow via the webcontrol.
webcontrol_parms 0
# Self-signed certificate
#webcontrol_tls on
#webcontrol_cert /etc/motion/ssl/motion.crt
#webcontrol_key /etc/motion/ssl/motion.key
############################################################
# Live stream configuration parameters
############################################################
stream_port 8081
stream_localhost off
stream_tls on
##############################################################
# Camera config files - One for each camera.
##############################################################
camera /etc/motion/config/camera1.conf
camera /etc/motion/config/camera2.conf
camera /etc/motion/config/camera3.conf
camera /etc/motion/config/camera4.conf
The only important parameters in the main motion.conf configuration file is setting daemon to on and the cameras configuration files, the rest of the configuration will be in separate configuration files, one for each camera. The Self-signed certificate part will be covered in the security part of this tutorial.
If you use multiple camera with motion you should create a configuration file for each one of them.
Using multiple webcams with motion detection
In this example I will create 4 files in the /etc/motion/ directory, camera1.conf, camera2.conf, camera3.conf and camera4.conf.
Camera1 will also be used to do live streams and has motion detection with audio. Camera2 is used to do surveillance. Camera3 is in the server room, has bad quality and triggers an alarm when motion is detected at the entrance. Camera4 is the same as camera3 but is used to monitor the main entrance.
If you work with more than one camera I suggest you to use different ones, not the exact same model so you can work with device by-id.
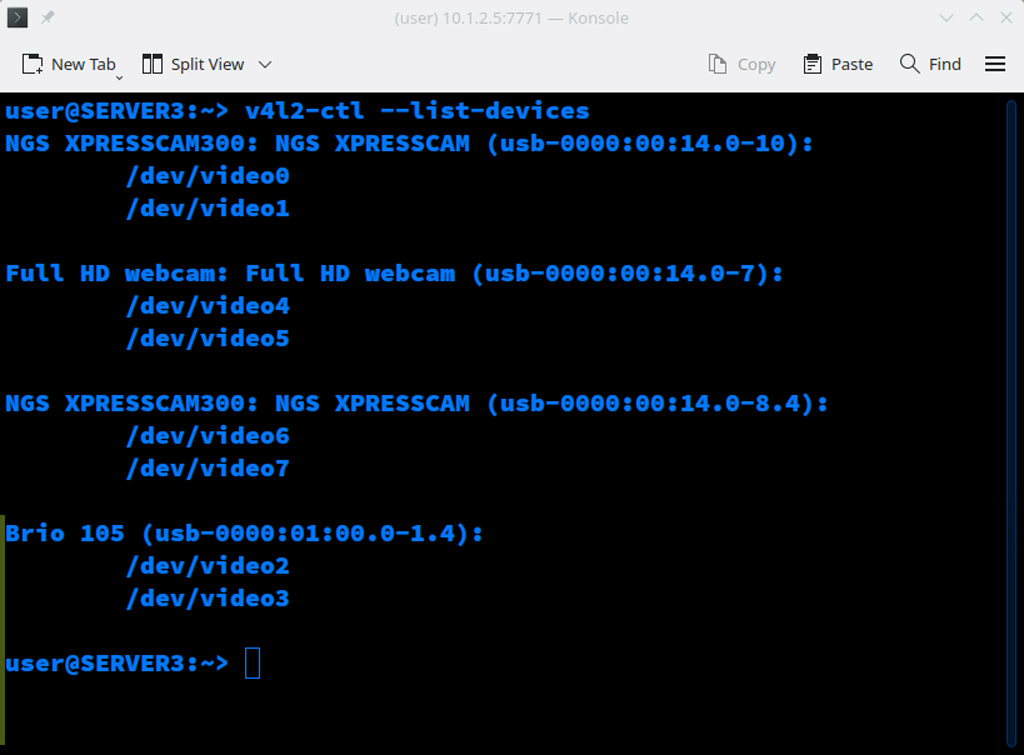
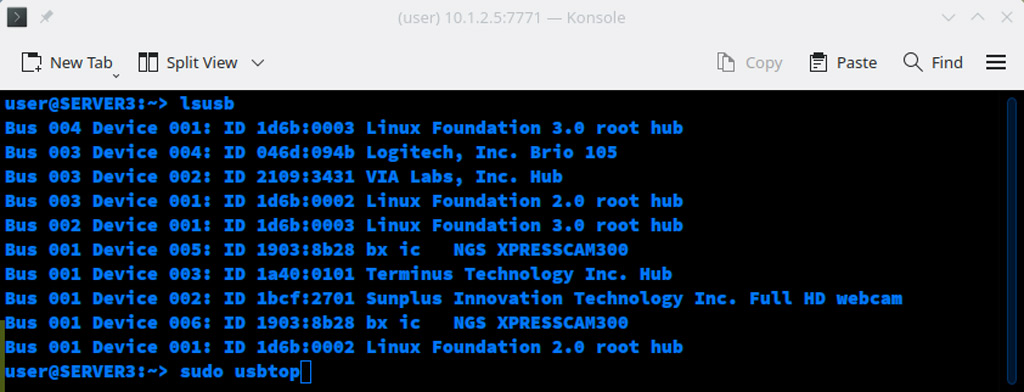
To create the configuration files you need a list of the webcams. Run the following command: v4l2-ctl –list-devices.
If you work with device by-id you can run the following command:
user@SERVER3:~> ls /dev/v4l/by-id
usb-046d_Brio_105_2443ZBQ5QCB8-video-index0
usb-046d_Brio_105_2443ZBQ5QCB8-video-index1
usb-bx_ic_NGS_XPRESSCAM300-video-index0
usb-bx_ic_NGS_XPRESSCAM300-video-index1
usb-SHENZHEN_AONI_ELECTRONIC_CO.__LTD_Full_HD_webcam_AN202011030002-video-index0
usb-SHENZHEN_AONI_ELECTRONIC_CO.__LTD_Full_HD_webcam_AN202011030002-video-index1
user@SERVER3:~>
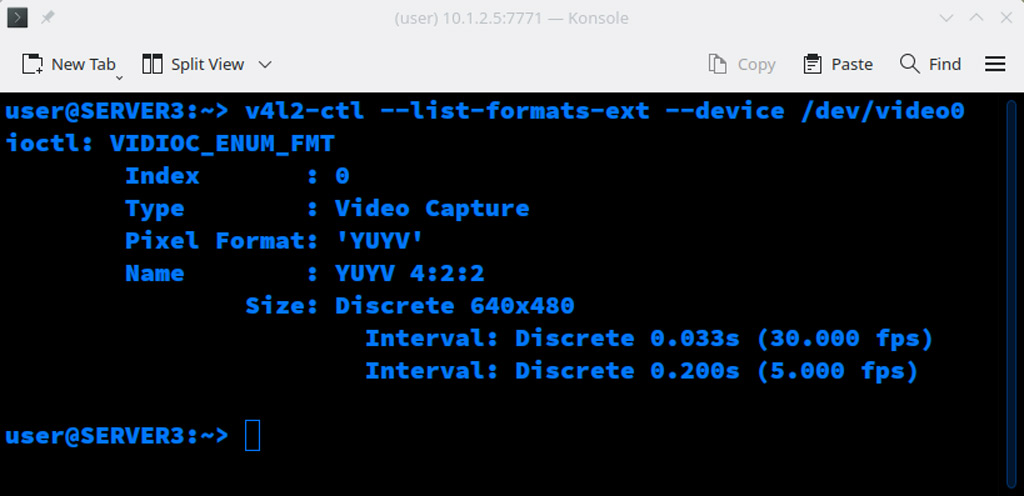
To be sure to do a proper configuration of the cameras you should check the supported resolutions with the v4l2-ctl command.
user@SERVER3:~> v4l2-ctl --list-formats-ext --device /dev/video0
ioctl: VIDIOC_ENUM_FMT
        Index       : 0
        Type        : Video Capture
        Pixel Format: 'YUYV'
        Name        : YUYV 4:2:2
                Size: Discrete 640x480
                        Interval: Discrete 0.033s (30.000 fps)
                        Interval: Discrete 0.200s (5.000 fps)

user@SERVER3:~>
This is the output for the low quality cameras, camera3 and camera4 that will be only used for motion detection so I will set them to 640×480 with 5 fps.
Here are the configuration files of the cameras for you to analyze or eventually replicate:
Motion Camera1
camera_name CAM-1
camera_id 001
video_device /dev/v4l/by-id/usb-046d_Brio_105_2443ZBQ5QCB8-video-index0
text_left CAM-1
width = 1920
height = 1080
stream_port 8082
stream_maxrate = 30
movie_quality 100
movie_max_time 1200
emulate_motion on
target_dir /data/motion-media/camera1
on_movie_start /bin/bash /etc/motion/config/motionaudio.sh start %m-%d-%Y_%H:%M:%S
on_movie_end /bin/bash /etc/motion/config/motionaudio.sh stop %m-%d-%Y_%H:%M:%S
I will not explain self-explanatory things, special to this camera is the use of the motionaudio.sh script, that allows you to have motion detection with audio. The other parameters are movie_max_time which is set to 1200 and emulate_motion which is set to on. With this configuration camera1 will record all the time and make videos with audio every 20 minutes.
Motion Detection With Audio
To add the motion detection with audio functionality you have to create a script, say, /etc/motion/config/motionaudio.sh and add these two lines in the configuration file of the camera:on_movie_start /bin/bash /etc/motion/config/motionaudio.sh start %m-%d-%Y_%H:%M:%S on_movie_end /bin/bash /etc/motion/config/motionaudio.sh stop %m-%d-%Y_%H:%M:%S
# vi /etc/motion/config/motionaudio.sh
# chmod u+x /etc/motion/config/motionaudio.sh
#!/bin/bash
moviedir=/data/motion-media/camera1 # change this
action=$1
audio=$2
aext=mp3 # change if you prefer a different audio format or extension
vext=mp4 # change this to what is specified in the motion.conf file for the line ffmpeg_video_codec
voutext=mkv #change this to the video file that will be created by joining the audio and video files

function startaudio () {
  if pgrep -f "arecord"; then sudo pkill -9 -f "arecord -f cd -r 22050 -D plughw:2,0"; fi
  arecord -f cd -r 22050 -D plughw:2,0 "${moviedir}/${audio}.${aext}" &
  audiopid=${BASHPID}
  echo "${audiopid}" > "${moviedir}/${audio}.pid"
}

function stopaudio () {
  audiopids=$(find ${moviedir} -type f -iname "*.pid" -printf "%f\n" | cut -d. -f1)
  while read -r x; do
          if pgrep -F "${x}.pid"; then sudo pkill -9 -F "${x}.pid"; fi
          if [[ -f "${moviedir}/${x}.${vext}" ]] && [[ -f "${moviedir}/${x}.${aext}" ]]; then
          ffmpeg -y -i "${moviedir}/${x}.${vext}" -i "${moviedir}/${x}.${aext}" -c:v copy -c:a copy "${moviedir}/${x}.${voutext}" &&  rm -f "${moviedir}/${x}".{$aext,$vext,pid}
          fi
  done <<< "${audiopids}"
  if ! pgrep -f "sudo nohup motion"; then sudo pkill -9 -f "arecord -f cd -r 22050 -D plughw:2,0"; fi
}

case ${action,,} in
stop ) stopaudio ;;
start ) startaudio ;;
esac
Motion Camera2
camera_name CAM-2
camera_id 002
video_device /dev/v4l/by-id/usb-SHENZHEN_AONI_ELECTRONIC_CO.__LTD_Full_HD_webcam_AN202011030002-video-index0
text_left CAM-2
stream_localhost off
width = 1920
height = 1080
stream_port 8083
stream_maxrate = 15
movie_quality = 90
target_dir /data/motion-media/camera2
Motion Camera3
camera_name CAM-3
camera_id 003
video_device /dev/v4l/by-id/usb-bx_ic_NGS_XPRESSCAM300-video-index0
text_left CAM-3
stream_localhost off
width = 640
height = 480
stream_port 8084
stream_maxrate = 5
movie_quality = 90
target_dir /data/motion-media/camera3
on_event_start /bin/bash /etc/motion/config/alarm.sh
Camera3 is configured to trigger an alarm when motion is detected.
# vi /etc/motion/config/alarm.sh
# chmod u+x /etc/motion/config/alarm.sh
#!/bin/bash
play /etc/motion/audio/security-alarm.mp3
Motion Camera4
camera_name CAM-4
camera_id 004
video_device /dev/video4
text_left CAM-4
stream_localhost off
width = 640
height = 480
stream_port 8085
stream_maxrate = 5
movie_quality = 90
target_dir /data/motion-media/camera4
on_event_start /bin/bash /etc/motion/config/alarm.sh
Performance Using USB Webcams With Motion
In this example using USB cameras you should take in mind this:
“USB cameras take a lot of bandwidth. A USB camera connected to a USB port or hub consumes virtually all the bandwidth that the port can handle. Even with a small framesize and low framerate you should not expect to have more than one camera per USB controller. If you need more than one USB camera it is possible to add extra USB PCI cards to your computer. It is also possible that your computer has more than one controller for different USB slots. For example, if the computer has six USB ports, the three on the left may be on controller A versus the three on the right may be on controller B.”
USB 3.0 devices enable improved image quality with less "pixelation" and latency when streaming and recording in HD or 4K therefore it is recommended for professional streaming or recording.
For this example with 4 webcams I added a USB3 controller, then I used the two other ones integrated in the motherboard.
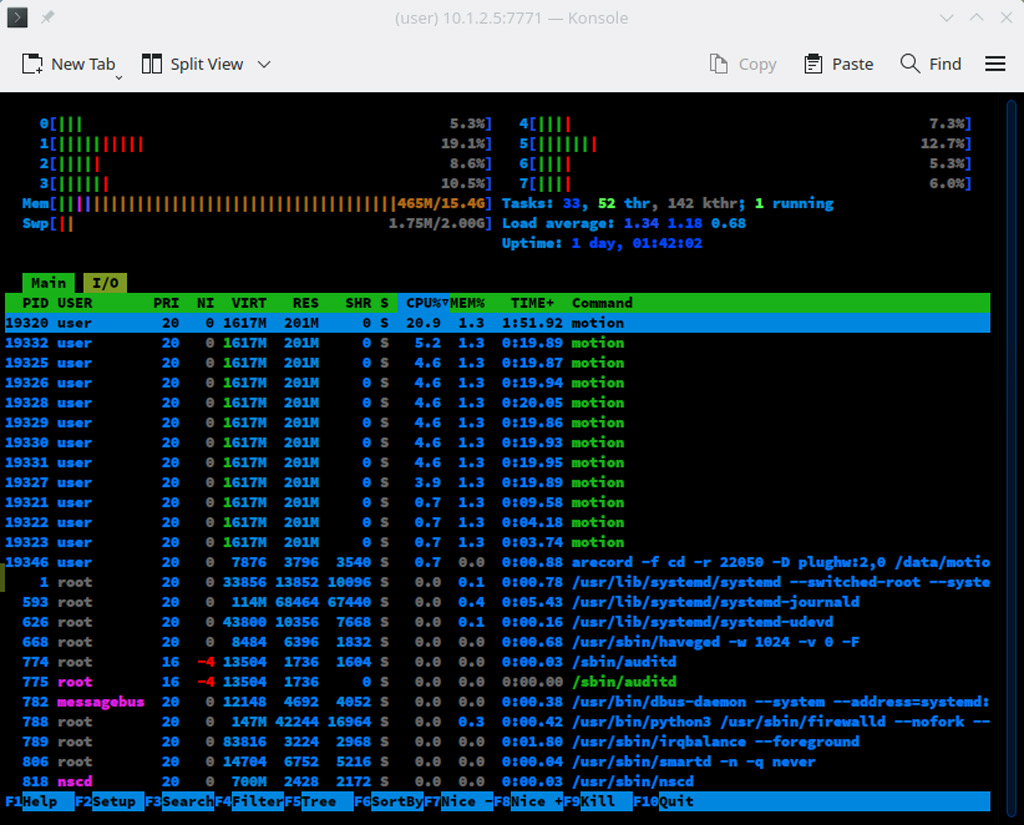
And, of course, you should use USB3 extension cables. You can use usbtop to monitor the USB webcam bandwidth usage:user@SERVER3:~> sudo usbtop
You can check the performance of the motion server with the htop command.
Testing Motion Detection
To start and stop motion you can use the following commands:
user@SERVER3:~> motion
[0:motion] [NTC] [ALL] conf_load: Processing thread 0 - config file /home/user/.motion/motion.conf
[0:motion] [NTC] [ALL] config_camera: Processing camera config file /etc/motion/config/camera1.conf
[0:motion] [NTC] [ALL] config_camera: Processing camera config file /etc/motion/config/camera2.conf
[0:motion] [NTC] [ALL] config_camera: Processing camera config file /etc/motion/config/camera3.conf
[0:motion] [NTC] [ALL] config_camera: Processing camera config file /etc/motion/config/camera4.conf
[0:motion] [NTC] [ALL] motion_startup: Logging to syslog
[0:motion] [NTC] [ALL] motion_startup: Motion 4.5.1 Started
[0:motion] [NTC] [ALL] motion_startup: Using default log type (ALL)
[0:motion] [NTC] [ALL] motion_startup: Using log type (ALL) log level (NTC)
[0:motion] [NTC] [ALL] become_daemon: Motion going to daemon mode
user@SERVER3:~> killall -9 motion
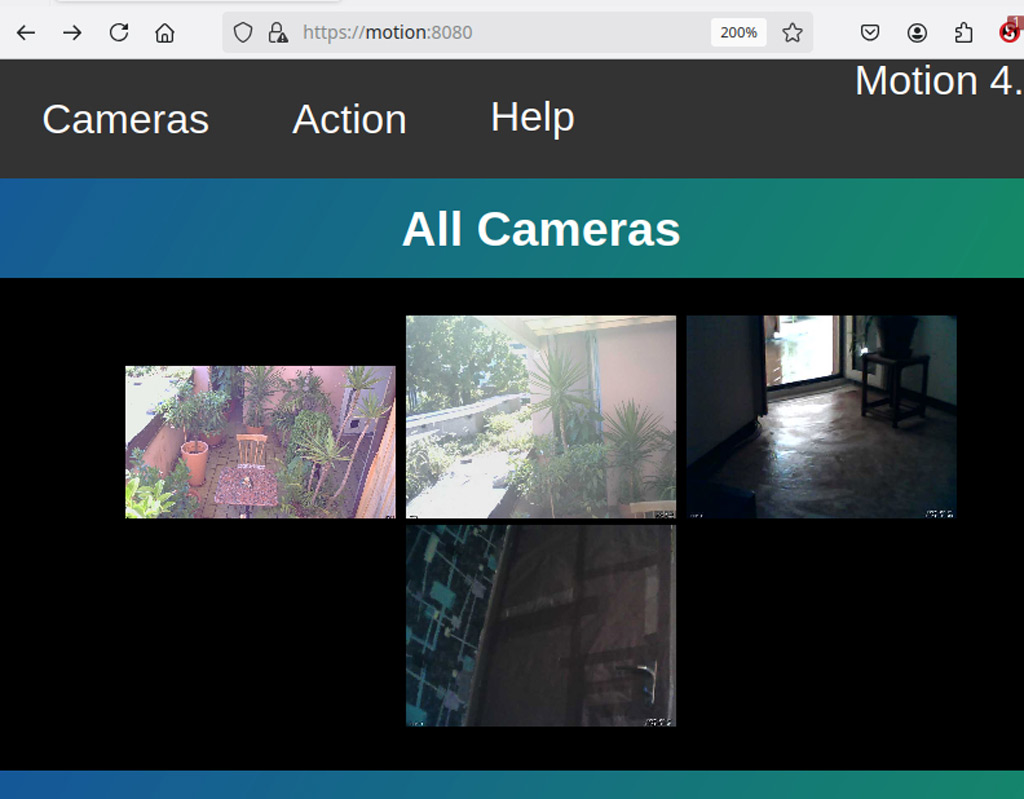
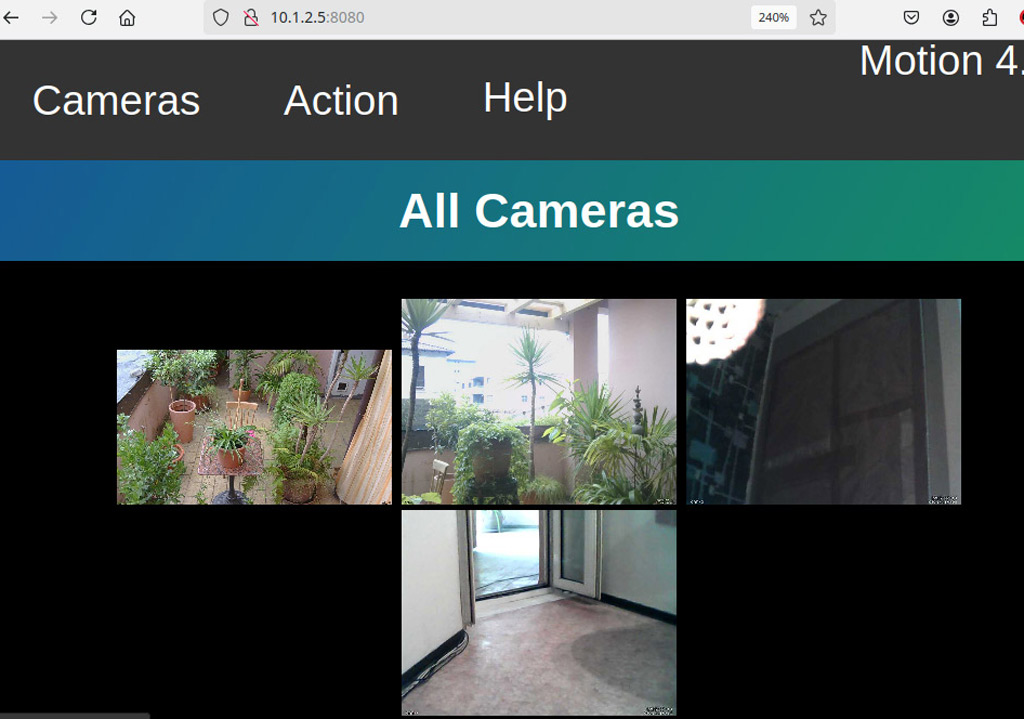
Once you are done with the configuration you can start motion and access the UI of motion by tipping the address of the server with the port 8080. For example: http://10.1.2.5:8080.
A web interface will appear in which you can see all the cameras at one time, start events and actions...
Motion Server Security and Securing the application
More details on security issues will be published in the second part of this tutorial, for now I want to share with you some good practices, especially if your goal is to create a simple internal surveillance system.
If you install the motion surveillance system local on your computer and you don’t want people to have access to it from other hosts (just locally), set stream_localhost to on.
If you use a script or a command that requires root privileges you should use sudo. To edit the /etc/sudoers file you can run visudo as root.
root ALL=(ALL:ALL) ALL
user ALL=(ALL:ALL) NOPASSWD: /usr/bin/nohup, /bin/pkill, /bin/mount, /bin/umount
If you want to secure the connection for internal use in your LAN you can create a self-signed certificate. To do that you have to create a self-signed certificate and use the web_control parameters in the configuration file of motion to enable it.
How to create a self-signed certificate for motion
# openssl genrsa -des3 -out privkey.pem 2048
# openssl req -new -key privkey.pem -out cert.csr
# openssl rsa -in privkey.pem -out motion.key
# openssl x509 -in cert.csr -out motion.crt -req -signkey motion.key -days 800
Now, you have to set the webcontrol_tls and stream_tls to on and add the certificate you created.
# Self-signed certificate
webcontrol_tls on
webcontrol_cert /etc/motion/ssl/motion.crt
webcontrol_key /etc/motion/ssl/motion.key

############################################################
# Live stream configuration parameters
############################################################
stream_port 8081
stream_localhost off
stream_tls on
You can also edit the /etc/hosts file of your host and add the following line:
10.1.2.5 motion
Once done you can access the UI of motion using https://motion:8080.