Requisiti
TUN/TAP deve essere installato e attivo. Per controllare se sia attivo o meno eseguire il seguente comando.
# cat /dev/net/tun
cat: /dev/net/tun: Il descrittore del file è danneggiato
#
Se tutto va bene si dovrebbe ricevere lo stesso output. Nel mio caso invece mi da un errore.
# cat /dev/net/tun
cat: /dev/net/tun: File o directory non esistente
#
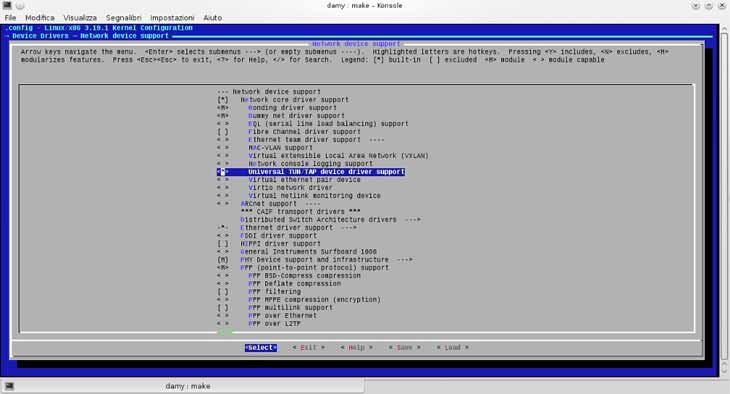
Ricompile il Kernel e aggiungiungere il modulo.
In Device Drivers -> Network device support scegliere “Universal TUN/TAP device driver support”.
Installazione
Usare zypper per installare openvpn con il seguente comando:
# zypper in openvpn
Impostazioni easy-rsa
Easy-rsa è un gestore di chiavi basato su OPENSSL. Per scaricarlo eseguire il seguente comando.
# wget -O easy-rsa-2.x.tar.gz https://github.com/OpenVPN/easy-rsa/archive/release/2.x.tar.gz
Poi estrarre il contenuto dall’archivio compresso con il seguente comando:
# tar -xf easy-rsa-2.x.tar.gz
Spostarsi nella cartella.
# cd easy-rsa-release-2.x
Copiare la cartella easy-rsa in /etc/openvpn.
workstation1:/home/chit/easy-rsa-release-2.x # cp -R easy-rsa /etc/openvpn/
Generare certificati e chiavi (Certificates & Keys)
Spostarsi nella cartella easy-rsa/2.0 (o la propria versione).
# cd /etc/openvpn/easy-rsa/2.0
Una volta nella cartella editare il file “vars” con vi o un altro editore di testo.
/etc/openvpn/easy-rsa/2.0 # vi vars
Modificare le informazioni relative alla propria località, città, il nome dell’organizzazione, l’indirizzo e-mail eccetera a proprio piacimento.
Una volta fatto eseguire il file “vars”.
workstation1:/etc/openvpn/easy-rsa/2.0 # ./vars
bash: ./vars: Permesso negato
workstation1:/etc/openvpn/easy-rsa/2.0 #
Nel mio caso mi da un errore. Per rimediare bisogna cambire i diritti del file.
workstation1:/etc/openvpn/easy-rsa/2.0 # chmod u+x vars
Ora funziona.
workstation1:/etc/openvpn/easy-rsa/2.0 # ./vars
NOTE: If you run ./clean-all, I will be doing a rm -rf on /etc/openvpn/easy-rsa/2.0/keys
workstation1:/etc/openvpn/easy-rsa/2.0 #
Eseguire il comando clean-all.
workstation1:/etc/openvpn/easy-rsa/2.0 # ./clean-all
Please source the vars script first (i.e. "source ./vars")
Make sure you have edited it to reflect your configuration.
workstation1:/etc/openvpn/easy-rsa/2.0 #
Il programma mi invita ad eseguire il comando source.
workstation1:/etc/openvpn/easy-rsa/2.0 # source ./vars
NOTE: If you run ./clean-all, I will be doing a rm -rf on /etc/openvpn/easy-rsa/2.0/keys
workstation1:/etc/openvpn/easy-rsa/2.0 #
Ora funziona.
workstation1:/etc/openvpn/easy-rsa/2.0 # ./clean-all
workstation1:/etc/openvpn/easy-rsa/2.0 #
Eseguire build-ca.
workstation1:/etc/openvpn/easy-rsa/2.0 # ./build-ca
Generating a 2048 bit RSA private key
...++
...........++
writing new private key to 'ca.key'
-----
You are about to be asked to enter information that will be incorporated
into your certificate request.
What you are about to enter is what is called a Distinguished Name or a DN.
There are quite a few fields but you can leave some blank
For some fields there will be a default value,
If you enter '.', the field will be left blank.
-----
Country Name (2 letter code) [CH]:
State or Province Name (full name) [ZH]:
Locality Name (eg, city) [Zurich]:
Organization Name (eg, company) [CHIT]:
Organizational Unit Name (eg, section) [IT]:
Common Name (eg, your name or your server's hostname) [christeninformatica.ch]:
Name [EasyRSA]:
Email Address [xxxxxx@]:
workstation1:/etc/openvpn/easy-rsa/2.0 #
Lasciare tutto com’è, se avete cambiato i valori all’inizio (nel file vars) verranno visualizzati automaticamente.
Generare il certificato e la chiave per il Server
workstation1:/etc/openvpn/easy-rsa/2.0 # ./build-key-server server
Generating a 4096 bit RSA private key
..................................................................++
......................................................................................++
writing new private key to 'server.key'
-----
You are about to be asked to enter information that will be incorporated
into your certificate request.
What you are about to enter is what is called a Distinguished Name or a DN.
There are quite a few fields but you can leave some blank
For some fields there will be a default value,
If you enter '.', the field will be left blank.
-----
Country Name (2 letter code) [CH]:
State or Province Name (full name) [ZH]:
Locality Name (eg, city) [Zurich]:
Organization Name (eg, company) [CHIT]:
Organizational Unit Name (eg, section) [IT]:
Common Name (eg, your name or your server's hostname) [christeninformatica.ch]:
Name [EasyRSA]:
Email Address [xxxxxx@xxxxxx]:

Please enter the following 'extra' attributes
to be sent with your certificate request
A challenge password []:
An optional company name []:
Using configuration from /etc/openvpn/easy-rsa/2.0/openssl-1.0.0.cnf
Check that the request matches the signature
Signature ok
The Subject's Distinguished Name is as follows
countryName           :PRINTABLE:'CH'
stateOrProvinceName   :PRINTABLE:'ZH'
localityName          :PRINTABLE:'Zurich'
organizationName      :PRINTABLE:'CHIT'
organizationalUnitName:PRINTABLE:'IT'
commonName            :PRINTABLE:'christeninformatica.ch'
name                  :PRINTABLE:'EasyRSA'
emailAddress          :IA5STRING:'xxxxxx@xxxxxx'
Certificate is to be certified until Mar 26 00:21:16 2025 GMT (3650 days)


1 out of 1 certificate requests certified, commit? [y/n]y
Write out database with 1 new entries
Data Base Updated
workstation1:/etc/openvpn/easy-rsa/2.0 #
Lasciare anche qui tutto com’è e confermare con “y” alle ultime due domande:
- Sign the certificate? [y/n]:y
- 1 out of 1 certificate requests certified, commit? [y/n]y
Generare il certificato e le chiavi per due clients
workstation1:/etc/openvpn/easy-rsa/2.0 # ./build-key client
Generating a 2048 bit RSA private key
........++
......................................................................................................................................................++
writing new private key to 'client.key'
-----
You are about to be asked to enter information that will be incorporated
into your certificate request.
What you are about to enter is what is called a Distinguished Name or a DN.
There are quite a few fields but you can leave some blank
For some fields there will be a default value,
If you enter '.', the field will be left blank.
-----
Country Name (2 letter code) [CH]:
State or Province Name (full name) [ZH]:
Locality Name (eg, city) [Zurich]:
Organization Name (eg, company) [CHIT]:
Organizational Unit Name (eg, section) [IT]:
Common Name (eg, your name or your server's hostname) [christeninformatica.ch]:
Name [EasyRSA]:
Email Address [xxxxxx@xxxxxx]:

Please enter the following 'extra' attributes
to be sent with your certificate request
A challenge password []:
An optional company name []:
Using configuration from /etc/openvpn/easy-rsa/2.0/openssl-1.0.0.cnf
Check that the request matches the signature
Signature ok
The Subject's Distinguished Name is as follows
countryName           :PRINTABLE:'CH'
stateOrProvinceName   :PRINTABLE:'ZH'
localityName          :PRINTABLE:'Zurich'
organizationName      :PRINTABLE:'CHIT'
organizationalUnitName:PRINTABLE:'IT'
commonName            :PRINTABLE:'christeninformatica.ch'
name                  :PRINTABLE:'EasyRSA'
emailAddress          :IA5STRING:'xxxxxx@xxxxxx'
Certificate is to be certified until Mar 26 00:25:48 2025 GMT (3650 days)
Sign the certificate? [y/n]:y


1 out of 1 certificate requests certified, commit? [y/n]y
Write out database with 1 new entries
Data Base Updated
workstation1:/etc/openvpn/easy-rsa/2.0 #
Per generare un secondo client fare la stessa cosa con client2.
Generare i parametri Diffie Hellman
workstation1:/etc/openvpn/easy-rsa/2.0 # ./build-dh
Generating DH parameters, 2048 bit long safe prime, generator 2
This is going to take a long time
......................................................................................................................................................................................................................................................................................................................................................................................................................................................................................................................................................................................................................................
File chiave (Key Files)
Ogni client ha bisogno di tre files chiave (Key Files) per potersi connettere e identificare, ca.crt, client.crt e client.key. Questi files si trovano in “/etc/openvpn/easy-rsa/2.0/keys”. Copiare i file sul computer del client.
| Nome del file | Necessari a | Scopo | Segreta |
|---|---|---|---|
| ca.crt | Al Server e a tutti i clients | Root CA certificate | NO |
| ca.key | A chi segna il certificato | Root CA Key | SI |
| dh{n}.pem | Al server | Parametri Diffie Hellman | NO |
| server.crt | Al server | Server Certificate | NO |
| server.key | Al server | Server Key | SI |
| client.crt | Al client | Client Certificate | NO |
| client.key | Al client | Client Key | SI |
Configurazione del client
Creare un file nominato client.conf per ogni client e aggiungere quanto segue.
client
remote xxx.xx.xxx.xx 1194
ca "/path/to/ca.crt"
cert "/path/to/client.crt"
key "/path/to/client.key"
comp-lzo yes
dev tun
proto udp
nobind
auth-nocache
script-security 2
persist-key
persist-tun
user nobody
group nobody
remote-cert-tls server
Sostituire naturalmente i dati come l’indirizzo IP del server (xxx.xx.xxx.xx), il nome del certificato, della chiave, la cartella in cui si trova eccetera presenti nell’esempio con i propri.
Configurazione del Server
workstation1:/etc/openvpn/easy-rsa/2.0 # cd keys
workstation1:/etc/openvpn/easy-rsa/2.0/keys # cp ca.key ca.crt dh2048.pem server.key server.crt /etc/openvpn/
Copiare il file di configurazione del server nella cartella /etc/openvpn.
workstation1:/etc/openvpn/easy-rsa/2.0/keys # cp /usr/share/doc/packages/openvpn/sample-config-files/server.conf /etc/openvpn/
Editare il file di configurazione del sever.
# vi /etc/openvpn/server.conf
Cambiare il valore della chiave dh in dh2048 al posto di dh1024.
# Diffie hellman parameters.
# Generate your own with:
#   openssl dhparam -out dh1024.pem 1024
# Substitute 2048 for 1024 if you are using
# 2048 bit keys.
dh dh4096.pem
Attivare la direttiva push “redirect-gateway def1 bypass-dhcp”
# If enabled, this directive will configure
# all clients to redirect their default
# network gateway through the VPN, causing
# all IP traffic such as web browsing and
# and DNS lookups to go through the VPN
# (The OpenVPN server machine may need to NAT
# or bridge the TUN/TAP interface to the internet
# in order for this to work properly).
push "redirect-gateway def1 bypass-dhcp"
Salvare il file.
Per ulteriori informazioni consultare anche la guida in inglese di OPENSUSE: OpenVPN Installation and Setup