Managing Virtual Machines and Networks using virsh
Virsh is a command-line interface for managing virtual machines and configuring their settings and hardware. Virsh is a powerful tool and can be used to perform a wide range of tasks, including configuring the hardware settings of virtual machines, managing virtual machine storage, and configuring virtual machine networks.
The virsh command is use manage virtual machines and the hypervisor on a Linux system. It uses the libvirt management API and operates as an alternative to the graphical virt-manager.
Some examples of virsh commands include:
- Guest management commands:
- start: Start a virtual machine
- stop: Stop a virtual machine
- Guest monitoring commands:
- memstat: Display memory statistics for a virtual machine
- cpustat: Display CPU statistics for a virtual machine
- Host and hypervisors commands
- capabilities: Display the host’s capabilities
- nodeinfo: Display the physical node’s system resource information
- Virtual networking commands
- net-list: Display a list of virtual networks
- net-define: Define a new virtual network
- Storage management commands
- pool-list: Display a list of storage pools
- pool-define: Define a new storage pool
- Snapshot commands
- create-snapshot-as: Create a snapshot of a virtual machine
List of virsh commands
# virsh start kali-linux
# virsh stop kali-linux
# virsh destory kali-linux
# virsh memstat kali-linux
# virsh cpustat kali-linux
# virsh nodeinfo
# virsh net-list
# virsh net-define virbr1
# virsh net-undefine virbr1
# virsh net-start virbr1
# virsh net-destroy virbr1
# virsh create-snapshot-as kali-linux kali-linux_snapshot
Other command-line tools that are part of virt-manger, like virt-install and virt-clone, can be used to create/install virtual machines on QEMU/KVM and clone them.
QEMU/KVM Virtualization – Virtual Manager (virt-manager) Tools
List of Virt-Manager Tools
- virt-install is a command line tool which provides an easy way to provision operating systems into virtual machines.
- virt-viewer is a lightweight UI interface for interacting with the graphical display of virtualized guest OS.
- virt-clone is a command line tool for cloning existing inactive guests. It copies the disk images, and defines a config with new name, UUID and MAC address pointing to the copied disks.
- virt-xml is a command line tool for easily editing libvirt domain XML using virt-install’s command line options.”
The advantages of using command-line based
The advantages of using virsh and other command-line based tools like virt-install and virt-clone instead of using a GUI like Virtual Manager (virt-manager) are:
- Automation and Scripting: Command-line tools allow for automating and scripting complex virtualization tasks and workflows, which can be useful for managing multiple virtual machines or for automating routine tasks.
- Remote Management: Command-line tools enable remote management of virtualization host, which is useful for managing virtualization resources on remote servers over SSH or other secure protocols.
- Headless Servers: Command-line tools are necessary for managing headless servers, where systems may not have a graphical interface or GUI tools installed.
- Custom Reports: Command-line tools allow for creating custom reports, which can be useful for generating detailed reports on virtual machine performance or resource usage.
- Unified Virtual Machine Administration: Command-line tools like virsh support working with multiple hypervisors, which can be useful for managing virtual machines on different hosts or for migrating virtual machines between hosts.
- Efficiency: Command-line tools are often more efficient than GUI tools, as they can perform multiple tasks with a single command, reducing the time and effort required to manage virtual machines.
- Learning Curve: Familiarity with command-line tools can also help users to learn more about the underlying virtualization technology and how to troubleshoot issues.
Overall, using virsh and other command-line based tools can provide more flexibility, automation, and efficiency in managing virtual machines, especially in large-scale or complex virtualization environments.
Virt-install and virt-clone: Creating and cloning Virtual Machines
Virt-install and virt-clone are command-line tools used to manage virtual machines in a Linux environment. Both tools are part of the virt-manager suite and can be used to create, clone, and manage virtual machines.
virt-install: Creating Virtual Machines
Virt-install is used to create a new virtual machine with a specific configuration. It allows users to create virtual machines with various operating systems, including Linux, Windows, and others. The tool provides a range of options for customizing the virtual machine, such as selecting the operating system, allocating resources, and configuring the network.
To use virt-install, you can run the following command:
# virt-install --name <vm-name> --ram <ram-size> --disk <disk-size> --os-type <os-type> --network <network-configuration>
Replace <vm-name> with the name of the virtual machine, <ram-size> with the amount of RAM allocated to the virtual machine, <disk-size> with the size of the virtual machine’s disk, <os-type> with the type of operating system being installed, and <network-configuration> with the network configuration for the virtual machine.
virt-clone: Cloning Virtual Machines
virt-clone is used to create a copy of an existing virtual machine. It allows users to clone virtual machines with all their configurations, including the operating system, disk, and network settings. The tool provides a range of options for customizing the cloned virtual machine, such as selecting the operating system and allocating resources.
To use virt-clone, you can run the following command:
# virt-clone --original <vm-name> --name <clone-vm-name> --ram <ram-size> --disk <disk-size> --os-type <os-type> --network <network-configuration>
Replace <vm-name> with the name of the original virtual machine, <clone-vm-name> with the name of the cloned virtual machine, <ram-size> with the amount of RAM allocated to the cloned virtual machine, <disk-size> with the size of the cloned virtual machine’s disk, <os-type> with the type of operating system being cloned, and <network-configuration> with the network configuration for the cloned virtual machine.
Both virt-install and virt-clone are powerful tools for managing virtual machines in a Linux environment. By using these tools, users can create and clone virtual machines with ease, making it an ideal solution for testing, development, and other purposes.
How to Create and Mange VMs Using virt-install and virsh
To create a virtual machine using virt-install, you can use the virt-install command. To have all information to create a virtual machine with virt-install you can use virsh to mange and list information about virtual machines and virtual networks. In this example the default network is not active so I have to specify the name of the virtual network.
The parameters needed to run the virt-install command are self explanatory, memory, CPU and disk size. If you don’t use the default network like in this example you have to specify it with the command option “–network”, in this case virbr1. If you run the command on a host without a Desktop environment you can use the option –noautoconsole. If you need a list of Operating system you can use the virt-install command option “–os-variant list”.
To find out what networks are active you can use virsh as follows:
SERVER3:~ # virsh net-list
 Name     State    Autostart   Persistent
-------------------------------------------
 virbr1   active   yes         yes

SERVER3:~ #
For more information on how to create a virtual network using virsh read my previous tutorial: How to Create a Routed Network on QEMU/KVM/libvirt Using Virsh
To list all available Operating Systems you can run:
SERVER3:~> virt-install --osinfo list
almalinux10
almalinux9
almalinux8
almalinux-kitten10

.....

clearlinux
debian13, debiantrixie
debian12, debianbookworm
debian11, debianbullseye
debian10, debianbuster
debian9, debianstretch
debian8, debianjessie

.....

winvista
winxp

You can see additional information with:

  osinfo-query os

SERVER3:~>
In this example I am creating a Virtual Machine for Kali Linux, so, I will use the last version of (Kali Linux is not available) Debian, debian13.
Finally, to crate/install a virtual machine run the following command:
# virt-install --name kali-linux --memory 15360 --vcpus 4 --disk size=50 --network=bridge:virbr1 --cdrom /var/lib/libvirt/kali-linux-2026.2-installer-amd64.iso --os-variant debian13 –noautoconsole
After creating the virtual machine you can verify its presence and start it with virsh as follows:
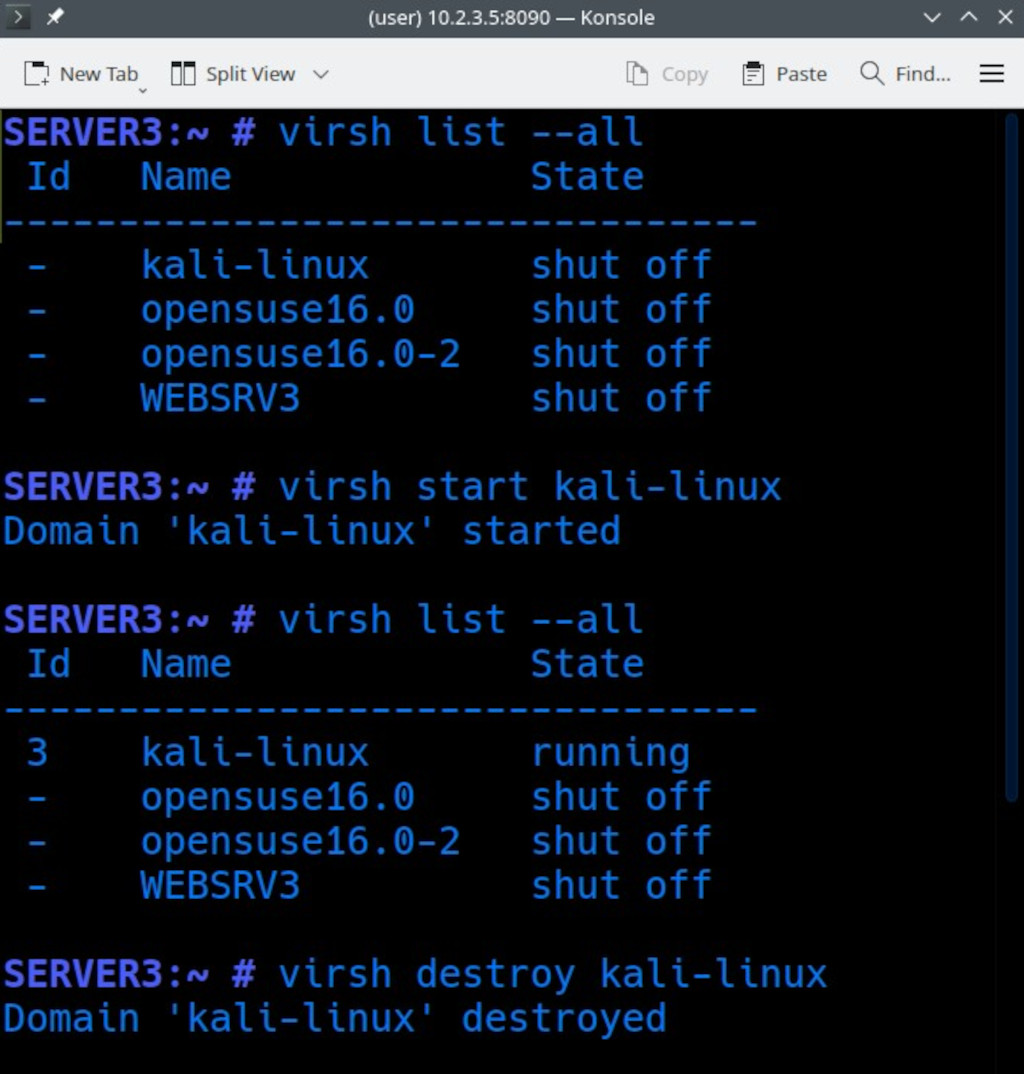
SERVER3:~ # virsh list --all
 Id   Name             State
---------------------------------
 -    kali-linux       shut off
 -    opensuse16.0     shut off
 -    opensuse16.0-2   shut off
 -    WEBSRV3          shut off

SERVER3:~ # virsh start kali-linux
Domain 'kali-linux' started

SERVER3:~ # virsh list --all
 Id   Name             State
---------------------------------
 3    kali-linux       running
 -    opensuse16.0     shut off
 -    opensuse16.0-2   shut off
 -    WEBSRV3          shut off

SERVER3:~ # virsh destroy kali-linux